Re: Maintaing Control in Stalls
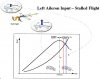
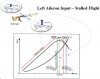
So in a stall, if you deflect the stick- say to the left. The right aileron goes down. You've now increased the angle of attack on the right wing;
The lift curve is a little misleading here. The deflected aileron doesn't change the AoA as measured by the graph; instead, the curve shifts upward and slightly to the left. I've modified your graph below to reflect this shift. This is what flaps do to the lift curve and the aileron is nothing more than a plain flap. If the wing stalls, it isn't due to the AoA increasing but due to the fact that the wing stalls at a lower AoA with a flap deflected.
Here's the key difference: even if the flapped wing stalls, it's still getting more lift than the unstalled wing without the flap. This is probably the physics that allows Darrol Stinton to argue in "Flying Qualities and Flight Testing of the Airplane":
It is argued that an increase in the apparent angle of attack through aileron deflection causes an earlier stall. I am not sure of this in practice. It can be demonstrated that AS LONG AS NO YAW IS ALLOWED TO DEVELOP one can apply full aileron, in either direction, almost at the point of the normall stall without provoking a premature asymmetric stall.
The key point about the yaw is that even if the flapped section of the wing doesn't experience a net loss of lift, it is still stalled with all the associated drag. If the drag causes it to yaw, the rearward motion will cause a loss of lift and a downward motion of the wing, further increasing the AoA and reducing lift, etc, etc, etc. But if the pilot avoids the yaw by using coordinated aileron and rudder, he can use the aileron with impunity.
The Airplane Flying Handbook agrees:
Even though excessive aileron pressure may have been applied, a spin will not occur if directional (yaw) control is maintained by timely application of coordinated rudder pressure. Therefore, it is important that the rudder be used properly during both the entry and the recovery from a stall. The primary use of the rudder in stall recoveries is to counteract any tendency of the airplane to yaw or slip. The correct recovery technique would be to decrease the pitch attitude by applying forward-elevator pressure to break the stall, advancing the throttle to increase airspeed, and simultaneously maintaining directional control with coordinated use of the aileron and rudder.
")
 op:
op: