You are using an out of date browser. It may not display this or other websites correctly.
You should upgrade or use an alternative browser.
You should upgrade or use an alternative browser.
L-39 BFM, One circle
- Thread starter ryan1234
- Start date
ryan1234
Desensitized Member
I saw him at the merge and then never again......did I miss something?
Yes! Right after the merge, as Snort does the lag roll you can see the opponent on the top of the screen (basically white jet against a green background) then after the lag roll you can see the opponent right over the front top of the seat.
rframe
pǝʇɹǝʌuı
Am I seeing this right? Lets call the camera ship air1 and the other air2. The merge is at :13, both aircraft in a left bank. Air2 pulls hard in a left level turn. Air1 pulls up and banks right, climbing. As air2 comes around the 180°-270° points from his original heading, air 1 has continued his roll to inverted and basically does a split-s onto air2's tail and at that point the fight is pretty much over.
Cool video, I'm jealous")
Cool video, I'm jealous
Hacker15e
Who am I? Where are my pants?
Not really a split s...a barrel roll, basically, but with a heading that is changing to match the turn of #2.
Most BFM can't really just be accurately described through words -- it requires some visualization because it is so dynamic.
A white board with colored markers is the best, or if you wear pink panties for a living, ACMI digital recreation of the fight.
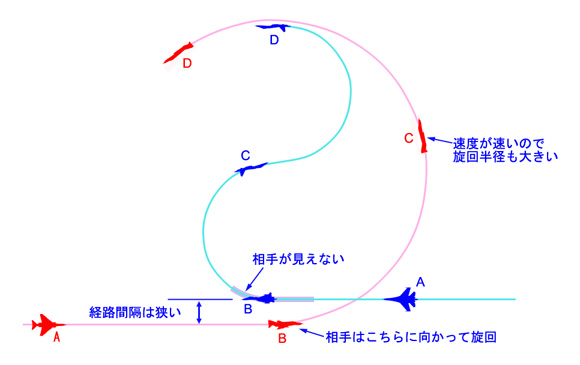
In general, it was something sort of like this, with the blue line using a healthy vertical component from points B to C to D.
Most BFM can't really just be accurately described through words -- it requires some visualization because it is so dynamic.
A white board with colored markers is the best, or if you wear pink panties for a living, ACMI digital recreation of the fight.
In general, it was something sort of like this, with the blue line using a healthy vertical component from points B to C to D.
Hacker15e
Who am I? Where are my pants?
I saw him at the merge and then never again......did I miss something?
I forgot to add...yes, you missed something -- the fight! LS, LF my friend!
rframe
pǝʇɹǝʌuı
So (and pardon my BFM ignorance, but this is cool stuff)... it seems like air1 has a killer superior position as early as point C because he's high with energy and is already setup to follow air2's moves any which way he decides to go, even if he decides to break right out of his original turn.... so what's the defensive move for air2 at position C if he see's what's cooking?
So (and pardon my BFM ignorance, but this is cool stuff)... it seems like air1 has a killer superior position as early as point C because he's high with energy and is already setup to follow air2's moves any which way he decides to go, even if he decides to break right out of his original turn.... so what's the defensive move for air2 at position C if he see's what's cooking?
The diagram isn't giving any vertical depiction, which would be being used and which would've been gone into. The red F-4 would be good to work into the vertical in order to negate blue's nose-on at point C......he's not going to maintain the constant G turn depicted; however the blue jet doesn't have a total advantage as the angle-off between the two jets....nearly 90 degrees....give the F-4 the possibility of placing his lift vector on the blue jet and pulling into him......rapidly closing the gap between the two, and forcing a possible overshoot of the blue jet, if nothing else is done, to where the F-4 can escape, or potentially reverse roles.
///AMG
Well-Known Member
I forgot to add...yes, you missed something -- the fight! LS, LF my friend!
Probably should have watched it on something bigger than an iPhone while I'm not housed....
Hacker15e
Who am I? Where are my pants?
So (and pardon my BFM ignorance, but this is cool stuff)... it seems like air1 has a killer superior position as early as point C because he's high with energy and is already setup to follow air2's moves any which way he decides to go, even if he decides to break right out of his original turn.... so what's the defensive move for air2 at position C if he see's what's cooking?
This simple line drawing only depicts where the airplanes were at a particular time in 2 dimensions. It doesn't show any 3-dimensional component...it doesn't show the relative speeds or ability to turn/point their nose, or the weapons or defenses that were available to be used. It was really just a simple line drawing submitted to try and help visualize in general what was shown in @ryan1234's video.
To answer your questions, realize that although the Flanker is pointing his nose directly at the Phantom at "C", we don't know if that's a true position or not...he might be 2,000' above the Phantom and not actually pointing his nose at all. In fact, we have no idea of the scale of the drawing -- that could be depicting an area that is 5 or 10 miles wide, or even 100 miles wide. We also don't know how fast he is...he may be pointing his nose, but because he is so slow, he doesn't have the ability to actually follow the Phantom as he moves. We also don't know what kind of weapon the Flanker wants to employ, and it could be that at the aspect he is at, he doesn't have a weapon he can actually employ.
Just realize that BFM is something that it takes military pilots a *lot* of dedicated time, both in the academic classroom and in the air, to even get the basics of. There are so many aspects of aircraft performance, weapon capabilities, maneuvers, and tactics, that it's quite impossible to really pay it any sort of due in a forum thread.
ryan1234
Desensitized Member
So (and pardon my BFM ignorance, but this is cool stuff)... it seems like air1 has a killer superior position as early as point C because he's high with energy and is already setup to follow air2's moves any which way he decides to go, even if he decides to break right out of his original turn.... so what's the defensive move for air2 at position C if he see's what's cooking?
I believe we actually came to the merge with less energy than the opponent. For the opponent it looked like it would be a two-circle, rate fight (based on our relative position at the merge) - which could have ended up in a number of situations. The debrief was that the opponent lost sight of us in the sun, during our lag roll, momentarily... He continued the turn, nose low at corner. We were relatively slow up top, which worked out well and did not result in an overshoot.
Prior to all of this we were working on Rolling / Flat Scissors and flying the aircraft in the post stall environment and maneuvering relative to the bandit. It amazing what you can do in that particular flight regime. At this point, I'm just along for the ride - trying to soak it all in about what is going on, hence the video-taking.
Hacker15e
Who am I? Where are my pants?
It hasn't even been established if it was drawn with a 3K pen or not.
I bet North isn't even up. And who ever heard of a Flanker being blue pen and a Phantom being the red pen?!
Hacker15e
Who am I? Where are my pants?
For the opponent it looked like it would be a two-circle, rate fight (based on our relative position at the merge) - which could have ended up in a number of situations. The debrief was that the opponent lost sight of us in the sun,
Part of the mistake is the "assumption" that it would be a 2-circle fight. Remember that "the last guy to turn is the one who decides what kind of fight it is". When he went nojoy, and missed Snort reversing his turn and going single circle, that is when the fight was lost.
I bet North isn't even up. And who ever heard of a Flanker being blue pen and a Phantom being the red pen?!
Hence why I wouldn't use the word "Flanker" (Well.....truthfully because I couldnt tell if it was a Flanker or Fulcrum
). But yes......is it an Iranian AF F-4 or something?Hacker15e
Who am I? Where are my pants?
Then comes the AA-12 from BVR, that makes all of this pointless.
Btw...where are my DLOs, and P2Ps? How am I supposed to get anything out of this???
Oh, you old dinosaur....Points To Ponder are long since passe. The vogue thing up to a year or two ago was "Debrief Focal Points". You obviously haven't been in the vault reading WIC papers on debriefs lately...heretic!
Oh, you old dinosaur....Points To Ponder are long since passe. The vogue thing up to a year or two ago was "Debrief Focal Points". You obviously haven't been in the vault reading WIC papers on debriefs lately...heretic!
I put my hands back in my flight suit hand zippered-pockets on the side, and shuffle away in shame.
Good thing is, I at least upgraded from the epaulet flightsuits that were permanently tapered with military press creases on the front.....with my silver/gold hours and combat hours stars on the sleeves
